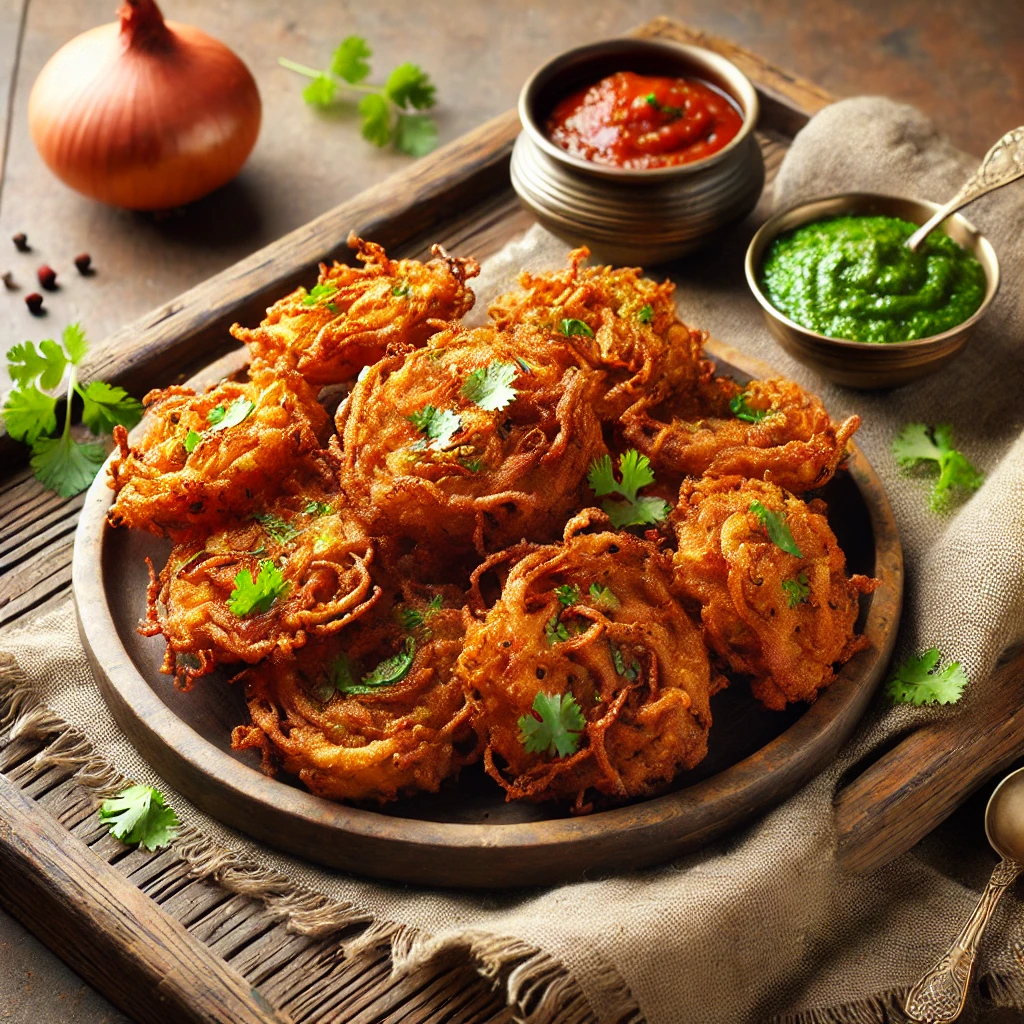
Onion Bhaji: The Ultimate Crispy Indian Fritters That Rival Any Takeaway
Master perfect onion bhaji with this foolproof recipe. Learn the secret to crispy, non-greasy fritters with sweet tender onions. Includes gluten-free option, air fryer method, and diabetic-friendly modifications.
Why This Onion Bhaji Recipe Creates Takeaway-Quality Crispiness Every Time
Onion bhaji seems simple—just onions and batter, right? Wrong. After countless soggy, greasy disappointments, I’ve cracked the code to authentic takeaway-quality results. The secret lies in three critical techniques: the onion preparation method that removes excess moisture, the flour combination that creates shatteringly crisp texture, and the temperature control that ensures golden perfection without greasiness.
The game-changer? Slicing onions paper-thin so they cook quickly, the rice flour and gram flour combination for extra crunch, and sparkling water for feather-light batter. This recipe includes gluten-free options, air fryer instructions, and diabetic-friendly modifications so everyone can enjoy these addictive fritters.
📋 Recipe Essentials at a Glance
- Prep Time: 15 minutes
- Cook Time: 12 minutes
- Total Time: 27 minutes
- Servings: 4 generous portions (makes 16-20 bhajis)
- Difficulty: Easy
- Dietary Info: Halal, Vegetarian, Diabetic-friendly option, Can be gluten-free
🛒 The Ultimate Ingredient Guide: Shop Like a Takeaway Chef
Onion Selection (The Foundation)
- 4 large brown onions – medium size works best
- Variety matters:Spanish onions for sweetness, brown for sharpness
- Preparation tip:Paper-thin slices cook quickly and evenly
- Moisture removal:Essential for crispy results
- Avoid:Red onions (too wet), spring onions (wrong texture)
The Crispy Coating (Texture Secret Formula)
- 100g gram flour (besan) – freshly purchased for best results
- 50g rice flour – the crunch game-changer
- 30g cornflour – creates shatteringly crisp texture
- 1 tsp baking powder – for air pockets and lightness
- 1 tsp chaat masala – for authentic street food flavour
- ½ tsp ajwain (carom seeds) – aids digestion and adds flavour
- 200ml ice-cold sparkling water – the lightness secret
The Spice Blend (Authentic Flavour)
- 2 tsp coriander seeds – lightly toasted and crushed
- 1 tsp cumin seeds – toasted and ground
- 1 tsp red chilli powder – adjust to taste
- ½ tsp turmeric powder
- 2 green chillies – finely chopped
- Small bunch fresh coriander – chopped, stems included
- Salt to taste
For Frying & Finishing
- Oil for deep frying – groundnut or rapeseed oil
- Chaat masala for dusting
- Lemon wedges for serving
- Fresh coriander for garnish
👩🍳 Step-by-Step Mastery: Takeaway Techniques Revealed
Phase 1: Onion Preparation (The Critical Foundation)
- Slice onions paper-thin using sharp knife or mandoline – consistency is key
- Separate into individual strands – breaks up rings for better coating
- Add salt and massage gently – draws out excess moisture
- Let sit for 10 minutes – onions will release water
- Squeeze out moisture using clean kitchen towel – essential step for crispiness
- Spread out on tray to air-dry while preparing other ingredients
Phase 2: The Spice Preparation (Building Flavour)
- Toast whole spices: Dry roast coriander and cumin seeds until fragrant
- Grind coarsely using mortar and pestle – texture adds interest
- Prepare fresh ingredients: Chop chillies and coriander
- Mix dry ingredients: Combine all flours, spices, and baking powder
- Divide mixture: ¼ for dusting, ¾ for batter
Phase 3: The Professional Coating Method
- Mix onions with dry spices and fresh ingredients
- Add flour dusting and toss gently – creates texture base
- Make batter: Gradually add sparkling water to remaining dry mix
- Achieve right consistency: Should coat onions without being too thick
- Combine onions with batter – add gradually, you may not need all
Phase 4: The Temperature-Controlled Frying Method
- Heat oil to 170°C – lower than meat pakoras for even cooking
- Test temperature: Drop small amount of batter – should sizzle and rise
- Form bhajis: Use two spoons to create irregular shapes – traditional look
- Fry in batches: Don’t overcrowd – lowers oil temperature
- Cook for 3-4 minutes until golden and crispy
- Remove with slotted spoon, drain on wire rack
- Maintain oil temperature between batches
Phase 5: The Professional Finish
- Season immediately with chaat masala while hot
- Serve on warmed platter with lemon wedges
- Garnish with fresh coriander and thinly sliced onions
- Serve immediately for maximum crispiness
💡 Pro Tips for Guaranteed Success
Onion Preparation Secrets:
- Paper-thin slices: Cook quickly without raw onion taste
- Salt massage: Draws out excess moisture that causes sogginess
- Squeeze thoroughly: Remove as much water as possible
- Don’t skip air-drying: Every bit of moisture removed helps crispiness
Batter Consistency Control:
- Thicker than pancake batter: Should coat spoon but still flow
- Add sparkling water gradually: May need less depending on onion moisture
- Test consistency: Drop a small amount in oil – should hold shape
- Keep cold: Place bowl over ice while working
Frying Perfection:
- Lower temperature: 170°C vs 180°C for meat pakoras – onions need longer
- Don’t overcrowd: Lowers oil temperature, creates greasy bhajis
- Wire rack draining: Prevents steam buildup that makes them soggy
- Season while hot: Chaat masala sticks better to warm surface
🍽 Serving Suggestions for Every Occasion
Traditional Street Style:
- Serve in newspaper cones for authentic feel
- Accompany with mint-coriander chutney and tamarind sauce
- Add thinly sliced onions soaked in vinegar for tang
- Serve with masala chai for complete experience
Party Presentation:
- Arrange in pyramid on large platter
- Provide variety of chutneys in small bowls
- Garnish withpomegranate seeds for colour contrast
- Serve withcocktail sticks for easy eating
Diabetic-Friendly Accompaniments:
- Sugar-free mint chutney instead of sweet tamarind
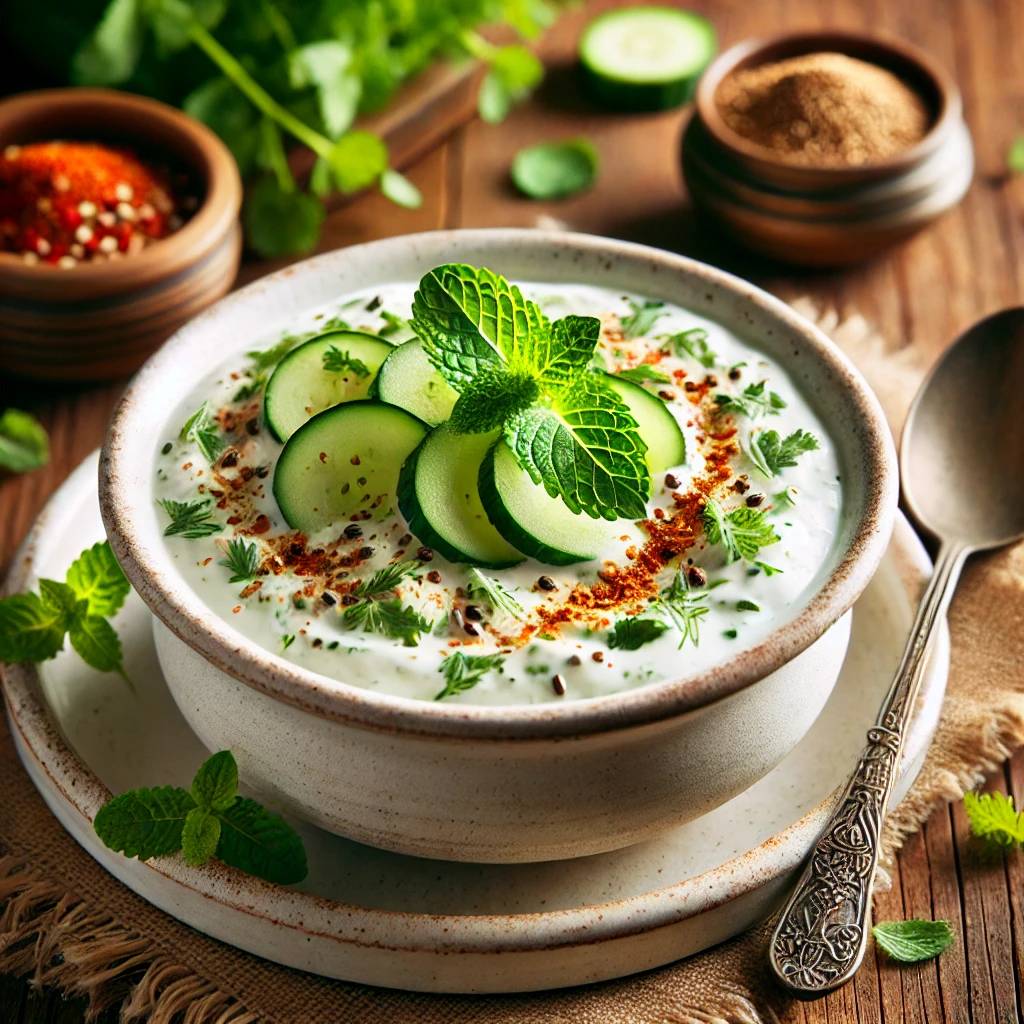
- Cucumber raita for cooling contrast
- Limit portion to 4-5 pieces
- Air fryer version for reduced oil content
🔥 Quick Mint-Coriander Chutney Recipe
Ingredients:
- 1 cup fresh mint leaves
- ½ cup fresh coriander
- 1 green chilli
- 1 inch ginger
- 2 tbsp lemon juice
- Salt to taste
- 2 tbsp water
Method:
- Blend all ingredients until smooth
- Adjust consistency with water
- Taste and adjust seasoning
- Serve fresh or refrigerate up to 3 days
🛒 Essential Equipment Recommendations
Must-Have Tools:
- Sharp knife or mandoline – for paper-thin slices – Get it here
- Kitchen thermometer – temperature control is critical – Get it here
- Wire cooling rack – essential for maintaining crispiness – Get it here
- Slotted spoon – gentle on delicate bhajis – Get it here
Nice-to-Have Upgrades:
- Mandoline slicer – consistent thin slices – Get it here
- Deep fryer – precise temperature maintenance – Get it here
- Spider strainer – easier handling of multiple pieces – Get it here
🔥 Nutrition Information & Health Benefits
Per serving (¼ recipe – 4-5 bhajis):
- Calories: 285 (deep fried) / 165 (air fried)
- Protein: 8g
- Carbohydrates: 38g (32g net carbs)
- Fat: 12g (varies with frying method)
- Fibre: 6g
- Glycaemic Load: 8 (good for diabetics with portion control)
Air Fryer Method:
- Preheat to 190°C for 5 minutes
- Spray bhajis generously with oil
- Cook for 10-12 minutes, turning halfway
- Spray again for better browning
- Results:60% less fat, slightly different texture but still crispy
Health Benefits Breakdown:
- Onions provide quercetin (antioxidant) and prebiotic fibre
- Gram flour provides protein and B vitamins
- Spices offer digestive and anti-inflammatory benefits
- Moderate calorie density with portion control
❓ Frequently Asked Questions
Q: My bhajis are soggy—what went wrong? A: Onions too wet (squeeze thoroughly), oil temperature too low (use thermometer), batter too thin (add more flour), or overcrowding pan (fry in small batches).
Q: Can I make these ahead for a party? A: Best served fresh, but you can first fry 2 hours ahead, keep warm in 50°C oven, then crisp up at 190°C for 2 minutes before serving. Don’t refrigerate cooked – they go soggy.
Q: My batter doesn’t stick to the onions—help! A: Onions too wet (squeeze thoroughly), batter too thin (should coat spoon), or not enough flour dusting. Mix batter with onions rather than dipping.
Q: Can I bake these instead of frying? A: Traditional bhajis require frying for authentic texture. Air fryer gives best alternative results. Oven baking doesn’t achieve same crispiness – they become onion cakes.
🔄 Delicious Variations to Keep Things Interesting
Mixed Vegetable Bhajis:
- Add thinly sliced potatoes and spinach
- Include grated carrot for sweetness
- Use cauliflower florets (small pieces)
- Perfect for using up vegetables
Spicy Chilli Bhajis:
- Add extra green chillies to batter
- Include red chilli flakes for heat
- Use hot paprika instead of mild
- Serve withcooling raita
Herb Garden Fresh:
- Add fresh herbs (dill, parsley, mint)
- Use herb-infused oil for frying
- Include spring onions for freshness
- Perfect for summer with light salad
📌 Loved this recipe? Share it & follow for more crispy and delicious snack ideas!